The Draft Editor
The rich text editor at the heart of Genesis Writer.
Last updated October 2026
Overview
The Draft Editor is where your writing lives. It's a rich text editor customized with extensions that make it purpose-built for creative writing with AI.
If you've ever used Google Docs, Notion, or any modern word processor, the Draft Editor will feel familiar. You get all the formatting tools you'd expect, plus deep AI integration that lets you generate, rewrite, expand, and polish text without leaving the editor.
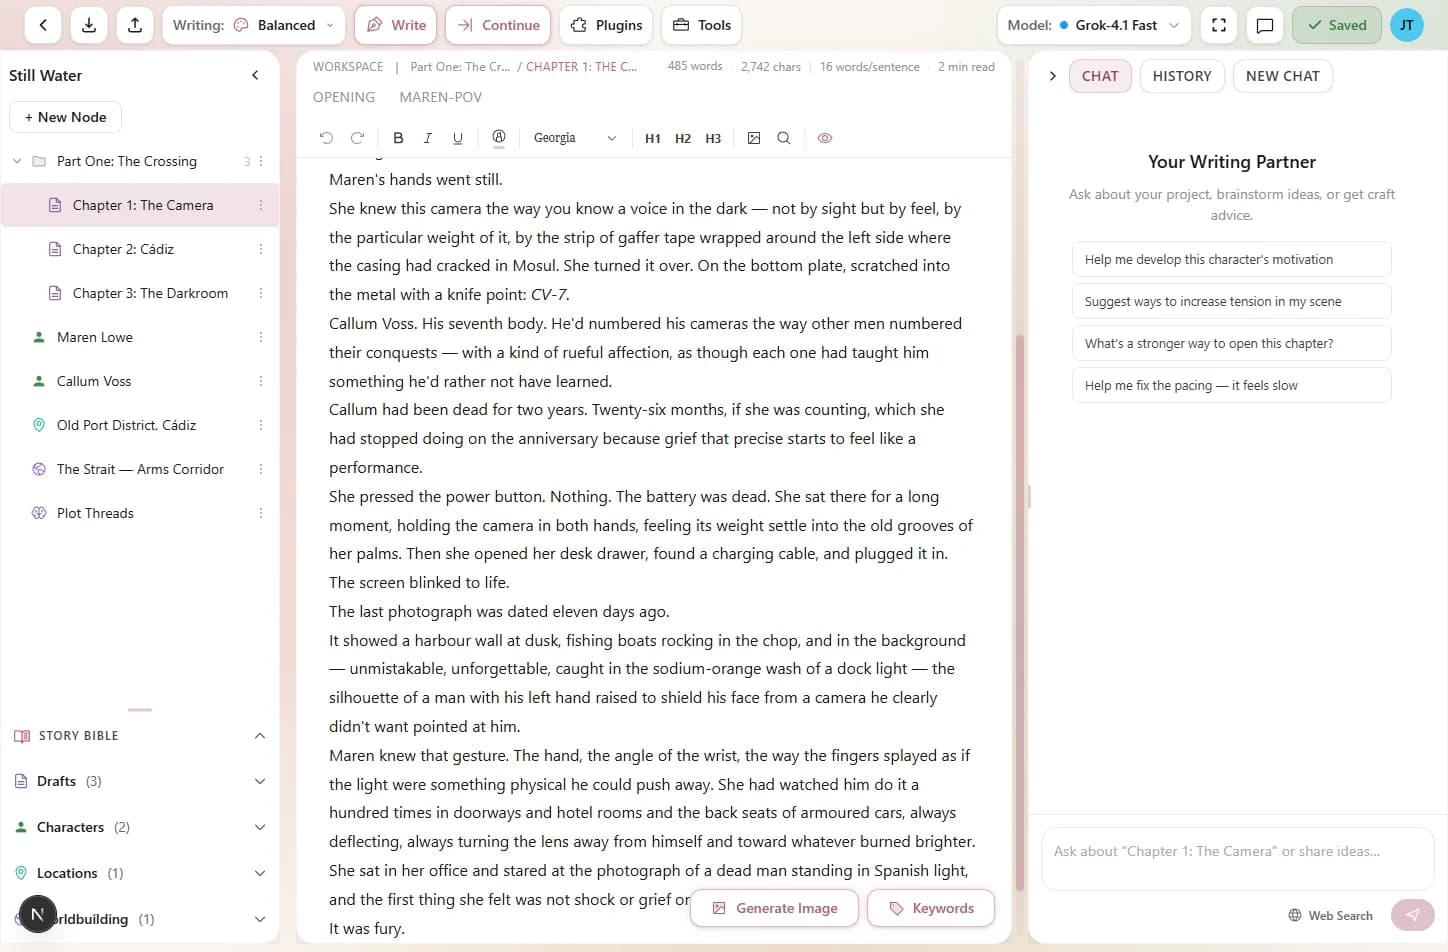
The Draft Editor — your primary writing surface in Genesis Writer
The Center Panel
The editor occupies the center panel of the three-panel writer layout. The left panel holds your node tree, and the right panel holds tools like AI Chat and History. The editor sits between them, taking up as much space as it needs.
You can collapse either side panel to give the editor more room. When you're deep in a writing session, collapsing both panels creates a focused, almost full-screen writing experience.
One Draft, One Editor
Each Draft node in your project gets its own editor instance. When you click a Draft in the left panel, the editor loads that draft's content. Switch between drafts and each one remembers exactly where you left off.
Only Draft nodes open in the editor. Other node types — Characters, Locations, Worldbuilding — have their own specialized editors tailored to their purpose. The Draft Editor is specifically designed for writing prose.
Under the Hood
The editor is built on a professional-grade rich text framework. This means the editing experience is fast, reliable, and handles complex document operations cleanly — things like undo/redo history, copy-paste with formatting, and state management.
Cursor positioning, selection behavior, and formatting all work the way you'd expect from a professional writing tool.
Formatting at a Glance
The editor supports a full range of text formatting:
- Bold, italic, underline, and strikethrough
- Headings from H1 through H4
- Ordered (numbered) and unordered (bullet) lists
- Blockquotes
- Text color and background highlighting
- Font family selection
- Text alignment — left, center, right, and justify
- Inline images
All formatting is accessible from the toolbar at the top of the editor, and most have keyboard shortcuts. For a complete list, see Text Formatting and Keyboard Shortcuts.
Autosave
The editor autosaves your work every few seconds. You'll see a small indicator in the toolbar that tells you the current save status:
- Saved — all changes are saved to the cloud.
- Saving... — a save is in progress right now.
- Unsaved changes — you have changes that haven't been saved yet (this is normal during active typing).
You never need to manually save, but if you want to force a save, press Ctrl+S (Cmd+S on Mac). The autosave debounce is short enough that you won't lose more than a few seconds of work even if your browser crashes.
Editor Capabilities
Beyond standard rich text features, the editor includes specialized capabilities for creative writing:
- AI generation markers — when AI generates text, a visual marker shows exactly where new content is being inserted.
- Inline comments — highlighted annotations linked directly to text passages.
- Search highlights — matches are highlighted when you use Find & Replace.
These capabilities work together seamlessly. You can have comments, search highlights, and AI markers all visible at the same time without conflicts.
AI Integration in the Editor
The Draft Editor is where AI generation happens. Here's a quick overview of how the AI tools connect to the editor:
- Writing and continuing — ask Chat, the assistant in the right panel, to write a new scene or continue from where your draft ends. The AI reads your existing text plus project context, and the prose arrives as a card in the chat; Insert into draft adds it to the end of your draft, or fills an empty one.
- Selection tools — select text and transform it with Rewrite, Expand, or Describe.
- Polish — clean up grammar and style in selected text.
There are no Write or Continue buttons in the editor. While prose is being written into a draft, the editor is read-only and a pill at the bottom centre of the editor shows a Stop button. You can review every change in the Activity tab.
Tips for Working in the Editor
- Write first, format later. Focus on getting words down. Formatting is easy to add after the fact, and it's preserved in exports.
- Use headings to structure chapters. H2 for chapter sections and H3 for subsections. This helps the AI understand your document structure.
- Keep drafts focused. One chapter or scene per Draft node works best. The AI context builder pulls from sibling nodes, so breaking your project into smaller drafts gives the AI better context.
- Trust the autosave. It's reliable. You don't need to Ctrl+S after every paragraph.